![]()


Horse Hoof Treatments | Toe Crack Repair
This is a beautiful looking 9-year-old Paint horse, which has a severe Toe Crack approximately 14 weeks old. The owner states the horse became lame for several days and finally an abscess vented out the coronary band and a slight crack appeared the length of the toe region.
To compound the injury the Paint is a weaver; this habit has the injury site constantly working because of the extreme pressure applied to the site with this habit.
Toe cracks are unique because they close as the horse places weight on the crack, while it opens once the weight is withdrawn.
This action is created by the horse bearing weight on the outer hoof wall, the internal pressure of the P3 "coffin bone" bearing it's load onto the sole which creates a drawing together effect on the two sides of the toe crack as the hoof wall is leveraged by the weight bearing of the P3 onto the inner sole. When the horse relieves his weight from that side, the crack opens back up from the relieved pressure.
After consulting with their farrier he stated that it is hard to keep front shoes on this Paint due to his walls breaking down. Presently this Paint walks noticeable lame.
You should always have a veterinarian xray the hoof first to check for internal complications before moving forward in the repair process.
![]()
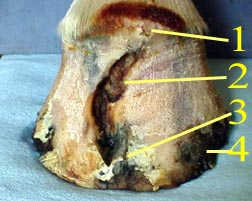
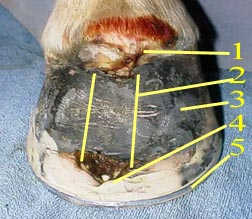
This was the condition of the Paint's left front hoof at first look.
- This is where the abscess vented
- The appearance of sensitive laminae
- The toe is cracked through the sole region
- Acrylic and thin weak flared walls, as indicated early by consulting with the farrier
After further evaluation:
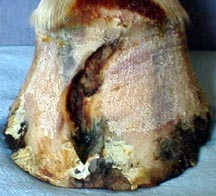
- The coronary band is dark where the abscess passed, which indicates the tissue is undermined and dead. This will need to be opened slightly for cleaning.
- The tissue is actually dead layer of hoof horn
- The injury will need to be opened wider to look for undermining in the toe region from the abscess.
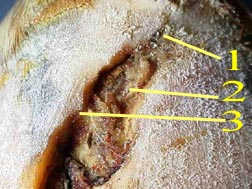
- The coronary band abscess path has been cleaned. You can see the crack follows right to the top of the coronary band.
- There is some minor bleeding of the tissue. The working of the crack, causing irritation to this area is constantly pinching the tissue.
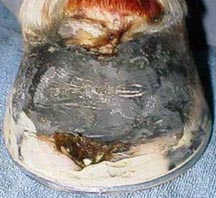
- The crack has been widened and no further undermining is present. This is indicated by the attachment of the layers of the hoof anatomy.
- Toe region is cleaned clear through to the sole.
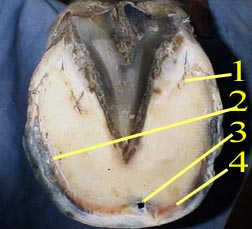
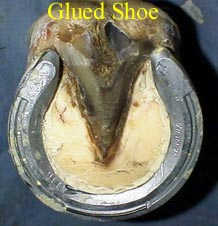
With this Paint being so lame and having trouble keeping shoes on. We will glue a pair of aluminum shoes on him. The benefit is two fold; this will spare the Paint the concussion from the nailing and clinching process and will give the walls a chance to become healthy again without the use of nails.As we prep the hoof for the gluing process we look for bruises, corns, abscesses.
-
The bars look in good shape.
-
Much of the shoe bearing area looks ok
-
This is where we cleaned out the toe area from the front side, as stated in the previous picture.
-
Some slight bruising, nothing that looks to bad.
So we will finish prepping for the Glue shoe on procedure.
View entire procedure in "Educational" section of this site.
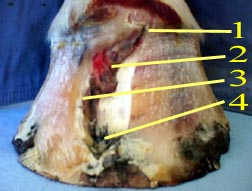
After completing the prep process I applied my "Millennium Patch Application Technique"
-
The abscess vent sight is cleaned and left exposed for medication.
-
A large vent is left so the injury can be kept thoroughly clean during the healing process. "Bridge Over Troubled Waters"
-
The Millennium Patch Application Technique allows for smooth contour to the hoof wall
-
The lower toe area is left open but rebuilt in the weight-bearing surface. This will help protect against a seedy toe.
-
The shoe is glued on, flares are gone making for a complete professional job in The Art of Hoof Repair
-
Decontaminate the entire area
-
Always build a vent
-
Apply your Patch technique with hoof bearing no weight
-
Back up the toe to reduce the internal leverage at break over
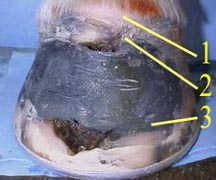
The picture on the right is 10 days after the initial work was completed.
1- You're starting to see nice clean growth at the coronary band.
2- The abscess path is growing down away from the coronary band.
3- The Millennium Patch Application Technique is firmly in place.
The after-care for the injury site:
1- Thoroughly clean by rinsing isopropyl alcohol through the vent daily
2- Wash through a mixture of 10% iodine base 90% "Pure Gum Turpentine"
3- Apply a small amount of mineral oil to the coronary band.
Good Luck,
Rusty Freeman
Rusty's Equine Hoof Repairs
![]()
![]()