![]()

![]()
The "Screw" Application Technique
Many repair techniques have been innovated over the years with the hope of developing a consistent avenue for the repair of "quartercracks". Some techniques are staples, screws, wire lacing, special stitches to name a few, while they all are generally supported by some type of an adhesive application, each application technique has it's own set of challenges. We can look at the skill level of the person performing the task, to the degree of difficulty in the technique itself.
As this site expands, we will review these challenges to each technique; hopefully we will improve our knowledge base so we can extend that out to the betterment of the Horse.
Below we will examine some hurdles with the using the "screw application technique"
![]()
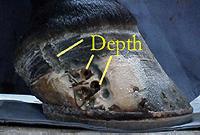
This is the hoof in question: after examining, the yellow lines in the photo point out where 2 screws have been removed and the yellow line above the patch points to where the crack appears to be migrating up the wall. It looks as if this patch has been on for a couple months, note the growth from the top of the patch. It is difficult to know the full background because this horse is a recent purchase and was shipped in from another state. The crack above the patch seems to be slight and not into the hoof horn, so the pinching might not be because of this. This leads me to the depth the screws were placed into the hoof wall. This is the challenge with entering screws into the hoof wall: The degree of difficulty in knowing how deep into the wall you are.
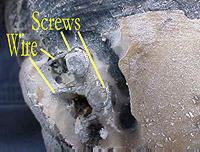
After the removal of the screws, I now need to carefully remove the wall and follow the path and depth of each screw. As we enter in to the path of the screw shank, through the hoof wall, hoof horn we find a small irritation.
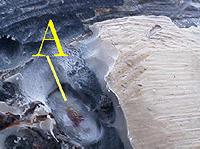
Photo point A It appears the end of the screw was to deep into the hoof, probably during severe concussion the expansion and contraction of the Hoof capsule would intensify contact, creating the pinching effect that the trainer felt was present. We need to clean out the entire area and look to see if there is any other damage.
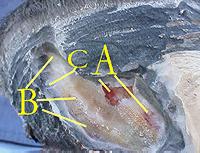
We now have cleaned out the injury, let's review the findings:
A - Points to where the end of the screw tips were aggravating where the hoof horn and the sensitive laminae engage, causing bruising and pinching during concussion.
B - The two lower yellow lines point out other bruising to the tissue. Where the upper yellow line points, notice the healthy white condition of the hoof horn Vs the lower
C - Above the line, looks like well conditioned horn, below we have a traumatized area.
My view on this is that over time this hoof would have abscessed to shed the tissue that the screw tips were irritating. This process will create a layer of scar tissue, which adds another layer of tissue between the screw tip and the sensitive laminae, thus creating a buffer zone! Eventually the hoof will come sound to the walk, but once extreme concussion is presented to the wall, lameness will set in because the internal structural damages.
In summary:
I have seen many horses successfully patched using the above method however,
the difficulty with this application is where do the screw tips end up
in the hoof anatomy and how can you verify that they will not create a
problem when concussion is delivered?
This approach may be better suited for use with cracks that involve the toe region.
I believe it is very difficult to develop a high skill level with this type of application because of the "Blind Entry" of the mechanical device.
Good Luck,
Rusty Freeman
Rusty's Equine Hoof Repairs
![]()
![]()