![]()

![]()
Horse Hoof Abscess Therapy Treatment
The next time a customer calls to say he has a horse that needs its hoof cut out because of an abscess keep this in mind!
This review will discuss when to open an injury and when not to open an injury. We will graphically walk you through a step by step process of the inflamed laminae tissue and the relaxed state of the laminae tissue after being subject to severe trauma.
The old saying, "cut all the bad away" but when is the question?
My experience has been when the hoof has a high level of inflammation i.e. heavy digital pulse, extreme soreness at the coronary band, visual drainage and difficulty accepting body weight on the injured hoof you need only to open up enough wall to allow for some minor draining. With some therapy, poultice or soaking the hoof in warm water with Epsom salts, the hoof will transition into the natural healing process. With this continued hoof therapy the inflammation will reside and the horse will start to place weight on the hoof once again.
If we remove this damaged anatomy before the inflammation has started to reside, with the sensitive laminae still inflamed, the laminae will proceed to push it's way through the wall structures and create what is sometimes referred to as proud flesh. Once this occurs, the hoof will be traumatized and become very sore for an extended period of time.
If we exercise the therapy method, waiting for the inflammation to reside, we can go in, find the migration path of the injury, precisely remove the damaged anatomy without creating further trauma to the hoof. We then can make the necessary repair and place the horse back into the excitement.
The hoof subject below had some initial wall removed before my services were requested. Let's take a look at the photo points below:
![]()
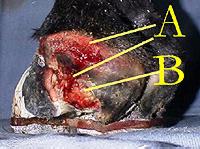
this is severely traumatized hoof, with a high digital pulse present. This abscessing has been periodically occurring at the same area over the past 6 months. This was the injury condition upon my arrival.
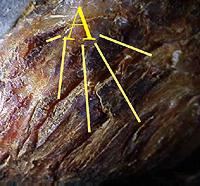
Point A identifies the areas of severe inflammation
Point B identifies the area of premature hoof wall removal and the glossy area is a serum that the Hoof produces when the initial trauma sets in.
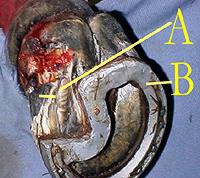
Upon further examination I have located what I believe is the root cause of this continual abscessing. Refer below.
A - points to the removal of the sole where the infection was residing for some time. I removed just enough to allow for drainage, note the two yellow lines; the sole tissue is firmly pressing on the inner hoof horn indicating inflammation. If we were to remove this wall under these conditions it would spell disaster. (Proud Flesh)
B- this shoe is commonly referred to as a "Window Bar."
72 hrs.
This hoof was soaked in a solution consisting of - 1gal of warm water, 1 cup of Epsom salts and ¼ cup of bleach twice a day for 1 hour. 72 hours have past since our first view.
A- Points out the hoof is drying from the outside in and starting to scab over. We will need to gently remove some of this scabbed tissue. "The Hoof needs to heal from the inside out!"
B- Points to the flaking dead hoof horn indicating the inflammation is leaving the hoof and we now can start to evaluate to see if any more hoof wall removal is required.
72 hrs.
A- 72 hours later I examine the sole; the yellow lines point out the gap that is now present between the hoof wall and sole of the hoof. This is an indicator that the inflammation is subsiding and the migration path of the abscess is starting to clearly be exposed. At this stage we can now precisely remove the dead and shed anatomy, being careful not to traumatize any live tissue.

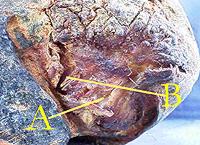
7 days later!
A- As you see the entire effected area of the hoof wall has been removed. Can you see the progress? Look how relaxed this injury appears now! These are the timely results that may be achieved with a thorough understanding of the hoof healing process.

A- Identifies that the inflammation and trauma to this hoof is almost completely gone. This is indicated by how the injury site is resting within the parameters of the Hoof wall, indicated by the yellow lines!
B- Points to what many refer to as a "cheater bar". This virtually has the same stabilizing capabilities as a normal bar, without creating the sliding effect when landing that a normal bar many times is criticized for.
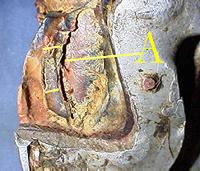
This is a close up of the injury site.
A- Points out the cracks in the tissue at the injury site, which appear to be dry. Test the condition by pushing firmly against the tissue with your thumb or fingers, this should be hard or very firm with no pain present. If this feels spongy, especially if pain is present you will need to carefully remove or slightly lance these areas. Many times fluid will become trapped in behind and will need to be relieved for proper recovery. This trapped fluid is a sure cause of why some injuries reoccur at the same site!
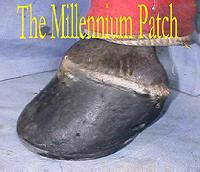
"The Millennium Patch Application Technique" was applied to this hoof 10 days after the first evaluation. In closing remember these points:
1. Begin by removing just enough to initiate relief
2. Provide therapy to relieve inflammation
3. Look for inflammation relief indicators
4. Precisely remove dead or shed anatomy without traumatizing live anatomy
5. Examine injury site carefully for fluid
6. Allow for shoeing support
7. Have your veterinarian examine your subject
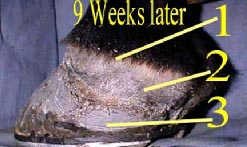
- Healthy Coronet Band
- New Clean Hoof Wall Growth
- The Millennium Patch Application Technique still firmly in place.
Good Luck,
Rusty Freeman
Rusty's Equine Hoof Repairs
![]()
![]()